These easy mini cheesecake bites are good old-fashioned cheesecake made with Philadelphia cream cheese and a buttery graham cracker crust. These mini cheesecakes taste amazing on their own or with a homemade berry sauce and they are addictive.

Now I am not sure why so many bakers have gotten away from this classic cheesecake recipe and moved on to fancier versions but this is the one and only for me. This cheesecake bites recipe is so good and really easy to make.
This is one of those recipes that I have been making for years for my family. In fact, they prefer these to most other desserts. I make these for birthdays, for holidays, for friends and sometimes, I make these just for me!
The reason I love this so much is that normally baking a full-sized cheesecake, whether a classic one or cheesecake with strawberries can be a bit more time-consuming or a bit too heavy for a dessert.
These bite-sized cheesecakes are the perfect amount and you can eat just one or you can eat more depending on your mood. I even make a mini Key lime cheesecake version since I love them so much!
Why You Will Love These
- Perfect amount: Mini bites of crunchy graham cracker crust and a light cream cheese filling are perfectly balanced desserts. It really is a much better experience and so much more manageable than a traditional large slice of cheesecake.
- Easy to serve: An added bonus with this mini cheesecake recipe is you do not need any plates or utensils. It is 100 percent a finger food kind of dessert.
- Easy to make: When making these cheesecake bites, the steps are really easy too! As you are baking the crust, you can assemble the cheesecake batter. If you are not good at multi-tasking, no worries! It still is quick and easy.
- Endless Toppings!: These cheesecakes are perfect on their own or with any berry toppings (more on that below).

What You Will Need
There are just the standard ingredients you will need to make these cheesecake bites.
- Cream cheese: I like to use full-fat cream cheese for the most flavor.
- Graham cracker crumbs: Regular honey graham crackers work best here!
- Butter: Unsalted butter
- Sugar: Regular granulated sugar
- Vanilla: Try to use a good quality vanilla extract. If you prefer to use vanilla vanilla bean pods, use the vanilla from one pod. If you are working with vanilla bean paste, a 1:1 ratio is perfect for this recipe.
- Egg: Large eggs
How To Make Mini Cheesecake Bites
Making this mini cheesecake bites recipe could not be any simpler. They are made in a mini muffin tin for the perfect little bites. If you have a special mini cheesecake pan, you can use that too. Here are what the steps look like:
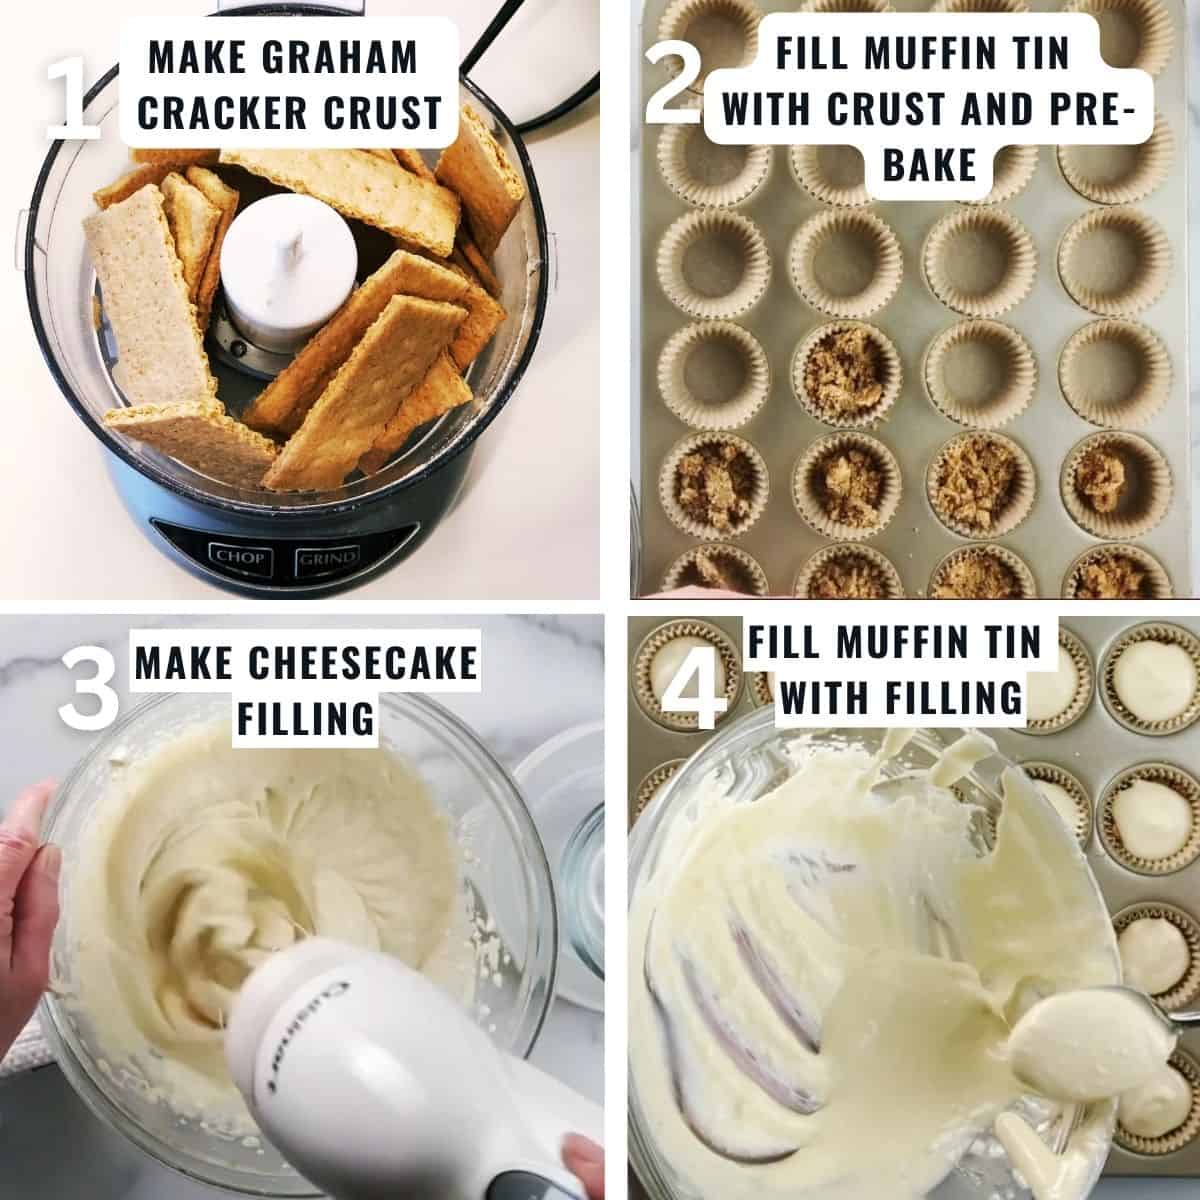
- Make the graham cracker crust for the cheesecake bites: Add graham crackers to a food processor or plastic bag and mash them up until they resemble fine crumbs. Then add melted butter and sugar and mix in a large mixing bowl.
- Graham Cracker crust: Place graham cracker mixture into muffin tins and press them down. Here you add the graham crackers crumbs to the lined muffin tin and gently press the graham crackers down. Once you have done this, you bake it for a few minutes.
- Make the cheesecake filling: While the graham crackers are baking, you grab another large bowl and begin whipping together the cheesecake filling. I like to use an electric mixer but you can also use a stand mixer with a paddle attachment.
- Add cheesecake filling to the baked graham cracker crust: Grab a tablespoon and fill the mini muffin tin with the cheesecake batter. Try to make sure they are all filled evenly. This ensures the perfect amount of cheesecake in each bite.
- Refrigerate: When they are done baking and are fully cooled, you want to make sure they are refrigerated for at least four hours to set up. This is the hardest part, waiting for them to set up and chill before eating. I promise it is worth the wait!
Toppings!
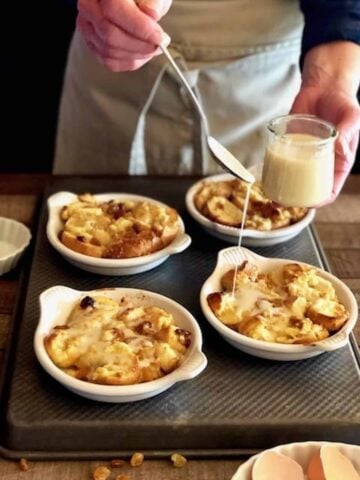
Now I really feel that these mini cheesecakes are perfect just the way they are. However, you can enjoy these cheesecakes in so many different ways! I highly suggest:
- A no cook blackberry puree for blackberry cheesecakes.
- homemade blueberry sauce if you want to make blueberry cheesecake bites.
- For berry cheesecake bites, a simple blueberry strawberry sauce is perfect.
You could also just use fresh strawberries or whipped cream for the topping.

Recipe Faqs
When you are thinking about what cream cheese to use for this dessert, you want to make sure that you are using full-fat cream cheese, not low-fat or fat-free. The higher fat content helps make sure the cheesecake bites come out creamy and helps prevent cracking.
If you find that the mini cheesecake bites crack after baking, some cracks are normal because there is no water bath that is used to make them. To avoid lots of cracks from happening, check those cheesecakes a couple minutes before the recipe time says to since all ovens vary.
No. That is the simplicity and greatness of this mini cheesecake bites recipe is that you are only adding these into a mini muffin pan and no other special baking techniques are needed.
Since this recipe does not use a water bath, a little sinking of the cheesecakes on top is normal. It makes the perfect space to add a topping if you are concerned about it.
Yes. You can substitute vanilla bean paste for extract using the same amounts.
Absolutely! Feel free to use your favorite cookie crust for this recipe. Oreo cookies or vanilla wafers are substitutes.
You will know when they are done when the center does not jiggle when you give the cheesecake pan a light shake.
Storing
This mini cheesecake bites recipe is meant to be made ahead of time so they have time to cool in the fridge. They can be made up to 3 days ahead of time and still retain that great crunch in the crust. These bite-sized cheesecakes can sit in your refrigerator during the week and you can grab one when you want a quick sweet treat. If you decide to make a double batch of these, you can freeze one of the batches for later.

For More Easy Dessert Recipes
If you love these cheesecake bites, you may also like these:


Mini Cheesecake Bites Recipe
Equipment
- mini muffin tin
Ingredients
Graham Cracker Crust
- ⅔ cup graham cracker crumbs You can pulse full size graham crackers in a food processor or smash them up well in a ziploc bag
- 3 tablespoon melted unsalted butter
- 1 ½ tablespoon granulated white sugar If you like a more decadent dessert you can use brown sugar instead of regular granulated sugar
- ¼ teaspoon kosher salt or ⅛ teaspoon regular salt
Cheesecake Filling
- 8 oz cream cheese at room temperature This is one full block of cream cheese. You should take the cream cheese out of the refrigerator about 1 hour before you are ready to use it.
- ¼ cup sour cream You can also use mascarpone cheese instead of sour cream.
- ¼ cup granulated white sugar
- 1 large egg
- 1 ½ teaspoon vanilla extract
Instructions
- Pre-heat your oven to 350 degrees
Making the graham cracker crust
- In a large bowl, add your ground graham crackers, melted butter, salt and sugar and mix well⅔ cup graham cracker crumbs, 3 tablespoon melted unsalted butter, 1 ½ tablespoon granulated white sugar, ¼ teaspoon kosher salt
- Line your mini muffin tin with mini muffin liners. If you do not have liners then grease the well of the muffin tray.
- Now scoop one good heaping teaspoon of your crust into each of the wells
- Do this until all of the crust is used up
- With the end of a wooden spoon or something similar in shape, press the crust into the wells of the tin well until it looks pressed and firm and the crust comes up of the sides a little bit. I use a bit of a rotating motion to push the crust up the sides of the cupcake liner a little bit.
- Place the crust in the pre-heated oven for 4-5 minutes. then remove and let cool.
Cheesecake Filling
- In a medium bowl, add your room temperature cream cheese, egg, sour cream, vanilla and sugar and mix really well until it becomes silky smooth (about 2 minutes with a mixer or about 4 minutes with a whisk)8 oz cream cheese at room temperature, ¼ cup sour cream, ¼ cup granulated white sugar, 1 ½ teaspoon vanilla extract, 1 large egg
- Take a heaping tablespoon of your cheesecake filling and place on top of the graham cracker crust. Keep doing this until all of the filling is used up. If there is any left over then evenly distribute it to all of the wells.
Baking
- Bake for 16-18 minutes or until you cannot see the center jiggle when you give the pan a light shake. Oven temperatures vary so start checking those cheesecakes at around 16 minutes.
- Remove from the oven and let cheesecakes cool completely in the pan. (The cheesecake will not be ready to eat until it has chilled so if you grab a test one to try just remember that the consistency will change and firm up once it is cold)
- Once the cheesecake have come to room temperature, place in the refrigerator for at least 3 hours or overnight to completely chill and set up.
- Once it is fully chilled you can remove them from the pan and enjoy them as is or add your favorite topping.
Notes
Nutrition
Nutrition Values are estimates only.
See full nutrition disclaimer hereTried the Recipe? We Would Love To Hear From You In The Comments Below!
Melissa says
Love hearing that!
Jenna says
Delicious!
Melissa says
Hi Jenna. Glad you enjoyed them 🙂
Amber says
So scrumptious! Delicious and easy to make
Melissa says
Hi Amber.
So glad you enjoyed it 🙂
Melissa says
I'm so glad you enjoyed them!
Karen k says
A huge hit at the holiday party.
Melissa says
Love hearing that 🙂
Diana says
I love these!!
Melissa says
Love hearing that!
Karen says
I also made berry sauce with strawberries and blueberries. This mini cheesecake recipe will now be a forever go-to. Super delicious and pretty easy. Thank you for publishing.
Melissa says
I am so glad 🙂
Melissa says
I like to store them for no more than 2 days to make sure the crust stays crisp 🙂
Lana says
They were so good!
Melissa says
Glad you enjoyed them!
Zara says
Hi! Have you ever done these in regular muffin tins instead of the mini size? Would love to know cooking times for that!
Melissa says
Hi Zara. We haven' tried it yet but plan to soon!
Jan says
I did a double batch and put them in a regular muffin pan (24). I started checking them at 18 mins and let them cook until they didn’t jiggle. About 10 more mins m/l
Melissa says
Hi Jan. Thanks so much for sharing! I hope you enjoyed them 🙂
Melissa says
Hi Sherri. This recipe is for those who are using a mini muffin tin (24 mini muffin wells in the tin). I hope this helps 🙂
JB says
Made these for a gathering and everyone loved them!
Melissa says
So glad everyone enjoyed them 🙂
Ginny says
I’ve made these three times now and they are so good!
Melissa says
Love hearing that 🙂
Brianna says
Love these!
Melissa says
So glad to hear that 🙂
Danielle says
So good!
Amaya says
Very delicious! Made them with the brown sugar crust version and they were devoured 🙂
Sara g says
Wonderful cheese cupcakes but I like cream cheese from a bag at a cheese/deli store, not the philly brick. It is a bit wetter but much tastier. I put cinnamon in the crust too 🙂
Melissa says
Hi Sara,
I am so glad you liked them! That cream cheese sounds heavenly 🙂 I will be on the lookout for this next time I am at the deli.